Making the most of available light for portraits

My model Miracle Guillory was photographed using only available light. I positioned her inside a doorway and shot with a 100mm telephoto. Exposure iso 100 1/20 sect @ f2.8. In retrospect, I should have chosen an higher ISO so I could use a higher shutter speed for hand holding.

One of the toughest skills to learn in photography is figuring where the best lighting which suits your subject can be found while on location.

By best lighting, I’m referring to strongest directional lighting that comes in generally a horizontal direction.

That light is usually found in a large doorway to a darkened room or window.

That’s the light I want to use as much as possible.

I take a light reading.

I photographed Brandon for his modeling portfolio using window light and reflectors. I turned off the light in the wall behind in my makeshift studio at my favorite coffee house.

Figure out the best compromise between high ISO and a shutter speed that I can hand hold with the lens I have in mind for my shot.

I also consider the depth-of-field especially if there is more than 1 person in the shot.

There may be other light sources but they are all secondary to this one light source.

Whenever possible, I will always use whatever available light that exists in a scene.

The advantage to using available light is you can see the modeling and you can often shoot with wide open apertures to blur out distracting backgrounds.

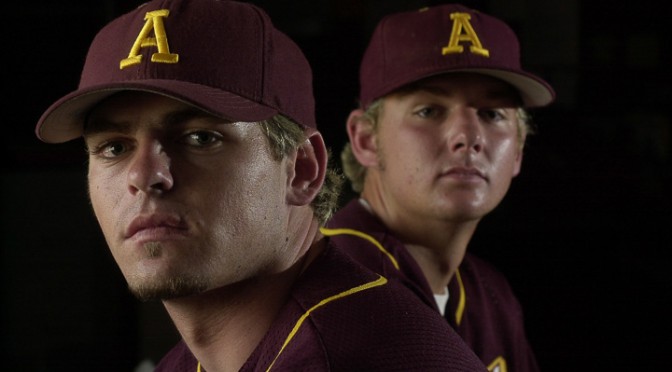
Available light was used but I supplemented the lighting with a speedily on the right because I needed to maintain detail in the shadow areas of the player's faces
Available light from a door on the left  was used but I supplemented the lighting with a speedlite on the right because I needed to maintain detail in the shadow areas of the player’s faces. In this instance a reflector would not have worked as well because the light from the door wasn’t very strong. I needed an aperture of about f11 to keep the player behind reasonable sharp.

Not only does this allow  you to work faster, in cases where you have large numbers of people, it is often easiest.

Here is the doorway where I photographed Miracle.

During a group photo shoot at the Graber Olive House last year, even though I had all the lighting gear in my arsenal, I sought out the best location for pictures based on available light and backgrounds.

In case you’re wondering why backgrounds matter, compare the picture I made of Miracle Guillory with the same scarf but at 2 different locations.

Here's essentially the same picture of Miracle but lit by Speedlite but against a different background. ISO400 1/30 f2.8
Here’s essentially the same picture of Miracle but lit by Speedlite inside a Octodome softgox placed on camera left. The busier background draws attention away from Miracle’s eyes and face.. ISO400 1/30 f2.8
My model Miracle Guillory was photographed using only available light. I positioned her inside a doorway and shot with a 100mm telephoto. Exposure iso 100 1/20 sect @ f2.8. In retrospect, I should have chosen an higher ISO so I could use a higher shutter speed for hand holding.

Generally speaking, front lighting where your key light is lighting your subject from the front is most flattering for women as it barely casts any shadows so it reduces wrinkles and skin imperfections.

But if your subject has a rounder face, it may not be as flattering since it may make their face appear rounder & chubbier. 😉

Compare the 2 pictures of Fryda Fernandez, a wonderful artist and friend who modeled for me recently.

In the left portrait of Fryda, my main light was the window.

I had a silvered reflector attached to a light stand which I moved closer or further depending on how much fill I wanted.

For the portrait on the right, I moved the silvered reflector much closer just out of the frame of the camera. Now the reflector is the main or key light.

Fryda lit from the side with a silvered reflector on the right. Notice the wrinkle on her left eye? Though that is an easy fix in post production with the healing brush either in Photoshop or Lightroom. See the picture on the right for the easier fix.
Fryda lit from the side with a silvered reflector on the right. Notice the wrinkle under her left eye? That is an easy fix in post production with the healing brush either in Photoshop or Lightroom. See the picture on the right for the easier fix.
In this picture, I asked Fryda to turn her face the other way, more towards my silvered reflector. Notice now you don't see the wrinkle on her left eye? Sometimes something as simple as changing the direction of a face towards a light source like this fixes the problem.
In this picture, I asked Fryda to turn her face the other way, more towards my silvered reflector on the right. Notice now you don’t see the wrinkle on her left eye? Sometimes something as simple as changing the direction of a face towards a light source like this fixes the problem.
The space I worked with when I photographed Fryda with just window light and reflectors.
The space I worked with when I photographed Fryda and Brandon. I used window light and reflectors.

Peter Phun Photography

Promote Your Page Too