Silhouette & Shadows.

While at Legoland in Carlsbad yesterday, Â I came across a good opportunity to illustrate how to photograph silhouettes and shadows for my class.
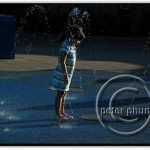
Most folks with cameras will take the picture on the left and move on.
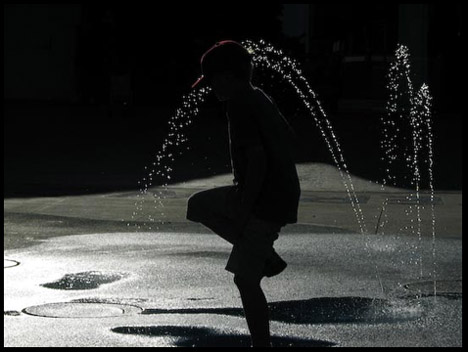
 Actually the picture on the right is what caught my eye when I went by.Â
Great color saturation. But boy was there a whole lot of clutter.Â
With my point-and-shoot, I knew I wouldn’t be able to blur out the distractions enough, so I didn’t even bother trying.
So what were my options?
A dictionary’s definition for silhouette:
- the dark shape and outline of someone or something visible against a lighter background, esp. in dim light.
- a representation of someone or something showing the shape and outline only, typically colored in solid black.
 In order to photograph a silhouette, conditions have to be right. You have to have:
- a small light sourceÂ
- and harsh light.
In my case,
- the sun, was low in the skyÂ
- and it can’t be cloudy.Â
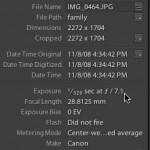
You can see from the metadata on the right, I took the picture at 4:34 pm.Â
All the pictures are from my (4 Megapixel) Canon Sureshot G3 point and shoot camera.
 I intentionally used the Manual mode on my camera so that Lightroom, Bridge or Photoshop can display shutter speed, aperture, ISO & other EXIF data for my pictures.
A key difference between a low-end point-and-shoot & a digital SLR camera is this: point-and-shoot cameras don’t have fast lenses with wide open apertures.
This doesn’t allow you to blur out the backgrounds.
They also don’t have a big range of shutter speeds. They do have compactness and convenience in their favor.
On automatic, the camera’s meter is exposing the image rather well allowing you to see detail in the kid’s face. But when you over-ride what the camera recommends, that’s where you’ll see the magic.
So if you don’t already know how to shoot on manual, this should be motivation enough for you to dig out your owner’s manual and figure that out.
Instead of exposing at 1/320 sec @f7 as I did for the 1st picture, I exposed at 1/2000 sec @ f8 for the second picture. That’s about 2 full stops of under-exposure.
The resulting image is almost monochromatic. The kid’s baseball cap has a hint of red but the rest of the image doesn’t show any color.
I didn’t want to see any details in clothes or faces. I was only interested in the graphical element and shape. My concern was to get a black shape and clean uncluttered background. Yes, backgrounds are still very important.
Any time you’re photographing water, dust, sand or anything translucent, you want to try and shoot it so that not only is is backlit, but the background should be dark, so the water will stand out.


Kids playing in water is always fun to watch. They don’t get self-conscious but you should be aware that parents understandably can get nervous if you behave suspiciously.
When  out in public if ever you encounter parents who challenge your picture-taking, just move on to another subject.
It’s not worth the aggravation, trust me.
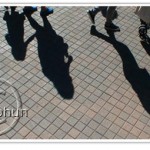
Here’s what I got for a shadow. I used the still image capturing mode of my camcorder Canon Optura Xi to capture this. I held the camcorder high over my head so that I could aim it downwards on the sidewalk.

Lakshu,
Thank you for visiting my blog and taking the time to comment. I’m pleased you found the post useful.
Let me know if you have questions. They can be the topic of a post which others can benefit from reading on this blog.
The way how you have differentiated silhouette & shadow with appropriate photos is really appreciable one. Good. Keep it up.
Bobby,
There’s a 2nd part on silhouettes in my next post. I covered that in class but I figured it might be useful especially if you weren’t there.
Peter:
Thanks for showing examples of the silhouette & shadows. It really makes things easier to understand.
Thanks Antonio for visiting and commenting.
This is an interesting point of view…
🙂